Summery Bundt Cake with Blueberries, Blackberries and Peaches – Knuspersommer 2017

Knuspersommer 2017Long time no see! Of course, that’s not true for those of you who are following me on Instagram, where I’ve regularly shown you news from my kitchen or organic garden. However, on my blog I’ve been rather quiet in the last couple of weeks. I was very busy working for University and I am happy to say that I passed everything and can now enjoy my summer holidays! 🙂More leisure time means more time to bake – and, as it was my grandfather’s 87th birthday last week, I wanted to bake something to his liking. I know that he loves “Guglhupf” (Bundt Cake) and so I let him choose from three very different recipes. Obviously, this very summery Guglhupf is the one he chose. I made it after this recipe by Sarah from Das Knusperstübchen, a blog I absolutely enjoy following. There are so many fabulous recipes on it and so far I’ve never been disappointed by them – everything I baked according to Sarah’s recipes turned out to be delicious.Similarly, this Bundt Cake was a success. My grandfather ate three slices and was super happy. Therefore, I’ve decided to make this my post for “Knuspersommer 2017“. The ingredients are not only summery in taste but also seasonal at the moment, which I find especially nice. The berries (I added blackberries as my grandfather really likes them) were all freshly picked in my organic garden. Perfect, don’t you agree?

I wish you all a great summer – enjoy the sunshine and the wonderful things nature provides us with right now!

Best wishes,
Bettina.

Rhubarb Strawberry Rolls (Recipe Testing) – Happy Easter!

HAPPY EASTER!
I hope you are spending these lovely days with your family, friends and a lot of good food!To today’s traditional family brunch I brought these absolutely lovely Rhubarb Strawberry Rolls. The recipe is from “Das Knusperstübchen” and you can find it right here!Believe me, this wonderful recipe will give you moist, fruity and fluffy rolls. The flavour of the rhubarb (from my organic garden) and the strawberries is simply amazing!. 🙂Go and check it out – and enjoy these holidays!

Best wishes,
Bettina.

Chocolate Pudding with Raspberry-Cream (Recipe Testing)

DSC06055b.jpg

Sometimes I crave a wonderful easy dessert, even though I don’t really have the time to make one. Have ever experienced this, too? Well, if you have, then this is a perfect recipe for you!

DSC05952bDSC06048bDSC05897b

It is super easy and quick to make and it only requires a handful of basic ingredients (no eggs!). The most important thing, though, is its fabulous taste: wonderfully chocolately with a small fruity twist.

DSC05916bDSC06019bDSC05811b

You can find the recipe on the wonderful blog “Ofenliebe” right here. Go and check it out!

DSC06059b

It’s simply perfect to enjoy a “glass of pudding” while sitting in the garden and watching the plants come to live again…I really adore spring!DSC06041bDSC05862b

I wish you all lovely rest of the weekend and a good start into a hopefully wonderful week.

Best wishes,
Bettina.

DSC06070b

Hedwig the Owl Almond Butter Cookies

dsc04978bbHedwig is one of my favourite Harry Potter characters – she is clever, loyal and beautiful! I especially love the musical theme she was given in the films. Imagine listening to this lovely sountrack while decorating your Hedwig cookies…pure bliss!

Where I live, we currently experience the change from winter to spring. The buzzards have begun flying over the hills again and the first spring flowers have returned. img_20170207_100545bbdsc05772bdsc05774bThis has inspired me to show you this recipe now. Remember the wonderful scene in the first Harry Potter film, in which Harry release Hedwig and when she returns to the castle, spring has come. I love this scene! Here you can watch it again!

Admittedly, Hedwig is a snowy owl and my owls have brown wings. However, even snowy owls are not completely white, especially in summer. 😉 If you want to make your Hedwigs even more “snowy”, you can, of course, leave away the cocoa powder and dust the wings with powdered sugar after baking, instead.dsc04986bFinally, we have to talk about the taste of these cookies. It is sadly often the case that super cutely decorated sweets are not quite as tasty as they look, for instance, because incredible amounts of sugary ingredients are used to make them beautiful. This is definitely not the case with these owls. As you will see below, the owls are decorated only with chocolate, cocoa powder and almonds – and all these bits add to the owl cookies’ fabulous taste!

The cookies are buttery, crisp and the smell and taste wonderfully of almonds…oohhhhh! Sooo good! What a pity I don’t have any left! 😉dsc04927bShow me your Hedwigs! I would be thrilled to receive a picture of your owl cookies on Instagram (@bettythebakingprincess)!

Best wishes,
Bettina.

_________________________________

Hedwig the Owl Almond Butter Cookies

preparation time: about 10 min
baking time: 8-10 min
decoration time: about 1 h
yield: about 20 owl cookies

Ingredients:

  • 230g butter
  • 230g white sugar
  • 1 egg
  • 1 tsp. vanilla extract
  • ½ tsp. almond extract
  • 380g flour
  • 1 pinch of salt
  • about 40 chocolate chips
  • about 20 whole almonds
  • about 50g almond slivers
  • cocoa powder

Preparation:

  1. Combine the softened butter and sugar.
  2. Then, add the egg, vanilla extract and almond extract.
  3. Combine flour and salt; sieve the mixture over the butter mixture and stir to combine.
  4. Refrigerate for at least ½ an hour.
  5. Line one or two baking sheets with baking parchment.
  6. Dust your surface with flour. Roll the dough until it is 7mm thick and cut out round shapes. Basically, you can make your owls as big or small as you wish. I chose a diameter of about 8cm.
  7. Now the best part begins: It’s time to create your owls! Use reserved cookie dough to form the white parts of the eyes and chocolate chips for the brown parts. Make the beak with a whole almond, the talons with almond slivers. Use a round cookie cutter (preferably one with a larger diameter than the one you use for the owl body) to create the wings but don’t cut through the dough entirely! To create the impression of feathers, use a knife or a fork. Dust the wings with cocoa powder using a small brush.

img_20161222_194305_993bimg_20161222_194446_161bimg_20161222_194554_323bimg_20161222_194711_439bimg_20161222_194840_939bimg_20161222_195015_054bimg_20161222_195326_646b

  1. Cool the cookies for at least 30 min, preferably longer (up to 1h), to help them keep their form when baking. Preheat the oven to 180°C.
  2. Bake the cookies for 15-20 min, take them out of the oven and let them cool down.
  3. Store them in the box, enjoy yourself or give them away as presents.

(recipe after Heather Baird from Sprinklebakes)

_________________________________

To get a printed version:
Download the pdf. (Both English and German versions available!)

Hedwig the Owl Almond Butter Cookies

Hedwig Eulen Mandel-Butter-Cookiesdsc04948b

Heart-Shaped Macarons with White Chocolate and Pomegranate Ganache

dsc05664b

Hello miloves!

Only a day to go until Valentine’s Day – and even though I never actually “celebrate” this day myself, I still enjoy creating a Valentine’s Day recipe each year. Last year I made cute Owl Cupcakes and the year before, I invented a heart-shaped version of a mini Victoria Sponge.

This year, I have the ultimate Valentine’s Day treat for you: it’s sweet, it’s pink aaaand it’s a macarons!

dsc05673b

I chose pomegranate as the fruity ingredient – I just loooove the look of the pomegranate seeds (and their taste as well, of course). The rest of the ganache is mainly white chocolate to make sure I could have the pinkest macarons ever.

To add an extra bit of glamour to my little beauties, I sprinkled them with a bit of gold glitter or painted little golden hearts on top of the macarons halves. The glitter was given to me by a dear friend for Christmas and I was so happy that I could finally try it out.

dsc05676bdsc05667b

I suggest that you serve pomegranate seeds along with the macarons. Firstly, because their sweetness can definitely do with a fruity counterpart and secondly, because, I must admit that the flavour of the pomegranate in the ganache is quite subtle. 😉

dsc05682b

Have a lovely Valentine’s Day and don’t hesitate to bake these little treats – macarons are honestly not as difficult to make as some people want to make you believe! To insure you get the perfect heart shapes, you can use this Heart Template.

Much looooove,
Bettina.

_________________________________

Heart-Shaped Macarons with White Chocolate-Pomegranate-Ganache

yield: about 25 macarons
preparation time: 1h
making time: 17 min

Ingredients:

For the macaron halves:

  • ­       145g almond flour*
  • ­       230g powdered sugar
  • ­       122g egg whites (i.e about 3 egg whites)
  • ­       42g sugar
  • ­       2 drops of red food colouring (gel)

* for almond flour: grind almonds extra finely; preferably, use peeled almonds

For the ganache:

  • ­       130g white chocolate
  • ­       0.25 dl pomegranate juice (fresh)
  • ­       0.40 dl cream
  • ­       1 drop of red food colouring (gel)


For the decoration:

  • ­       pomegranate seeds
  • ­       edible gold glitter


Preparation:

  1. For the preparation of the ganache: Bring cream to the boil and pour over white chocolate until the chocolate has melted. Add the food colouring. Let it cool in the fridge for at least 2h.
  1. For the macaron halves: Mix almond flour and powdered sugar. Whisk the egg whites until almost stiff, then, add the sugar while whisking. As soon as the mixture forms little peaks, add the food colouring.Add the almond flour-powdered sugar mixture in three steps. Fold it carefully into the egg whites-mixture.
  1. Put the mixture into a piping bag with a round nozzle and pipe the hearts according to the template onto the baking parchment.dsc05637b
  2. Let the hearts rest for at least 30-45 minutes (make there’s no draught!). Preheat the oven to 130°C.
  3. Bake the macarons for about 17 minutes. Afterwards, take them together with the baking parchment off the baking tin. Detach them carefully from the baking parchment when they are quite cool.
  4. As soon as the macarons are completely cool, fill them with the ganache and put the halves together. Decorate with the old glitter.dsc05650bdsc05676b
  5. Store in the fridge for up to 48 hours. Serve with pomegranate seeds. Enjoy!

Tip: You can easily prepare the macaron halves on the day before.

_________________________________

To get a printed version:
Download the pdf. (Both English and German versions available!)

Heart-Shaped Macarons with White Chocolate-Pomegranate-Ganache

Herz-Macarons mit Weisser Schokoladen-Granatapfel-Ganache

dsc05654b

Apple Rose Tarte (Recipe Testing)

dsc05595bHello my dears!

Today, I want to show you this lovely tarte I made yesterday! Isn’t it gorgeous? I never belived it might turn out this nice, when I saw a picture from Caketime by Tamaris on Instagram.dsc05608bdsc05633bI looked up the recipe and saw that is was actually quite simply and straight-forward! So, I decided to give it a try.dsc05587bdsc05609bThe result really blew me away! The combination of the tarte’s spectacularly beautiful look and its traditional, wonderful flavour is soooo cool! The crust turned out crisp and wonderfully buttery, the filling delicate and not too sweet and the apples – well, I love roses, what can I say! I have many roses in my organic garden in summer, such as this one here…dsc02440blog…which makes this tarte look and taste like a promise for spring and summer.dsc05568bdsc05636bdsc05596bGo ahead and try this recipe yourselves – it needs a bit of time, but it is totally worth it! The recipe can be found here! And in the following you can see how I made my version:

dsc05526bdsc05529bdsc05521bdsc05534bdsc05530bdsc05541bdsc05555bI hope you’ll like this tarte as much as I did!

Best wishes,
Bettina.

dsc05621b

Oreo Baileys Chocolate Mousse Cake with Pears

DSC05237b.jpg

Hello my dears!

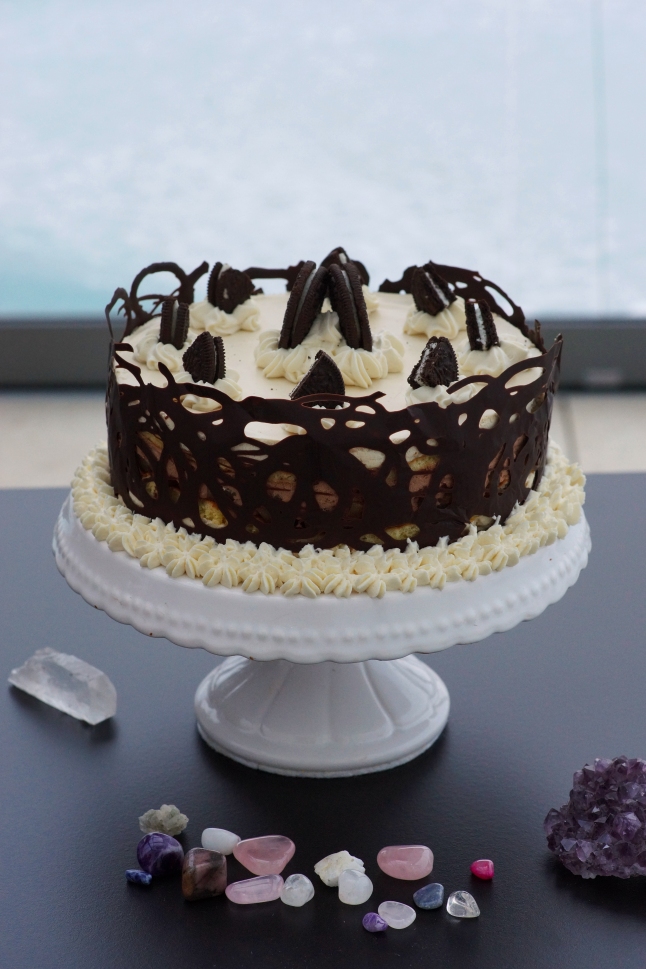
Today, let me show you a recipe I am very proud of. This fantastic cake is sooooo good and so beautiful…I know I shouldn’t boast, but believe me, it’s one of the best I ever made.

dsc05260bDSC05073b.jpg

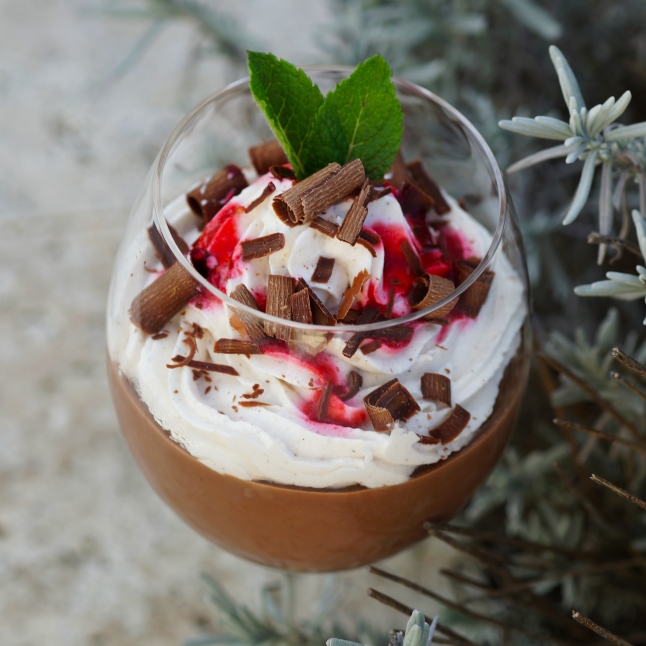
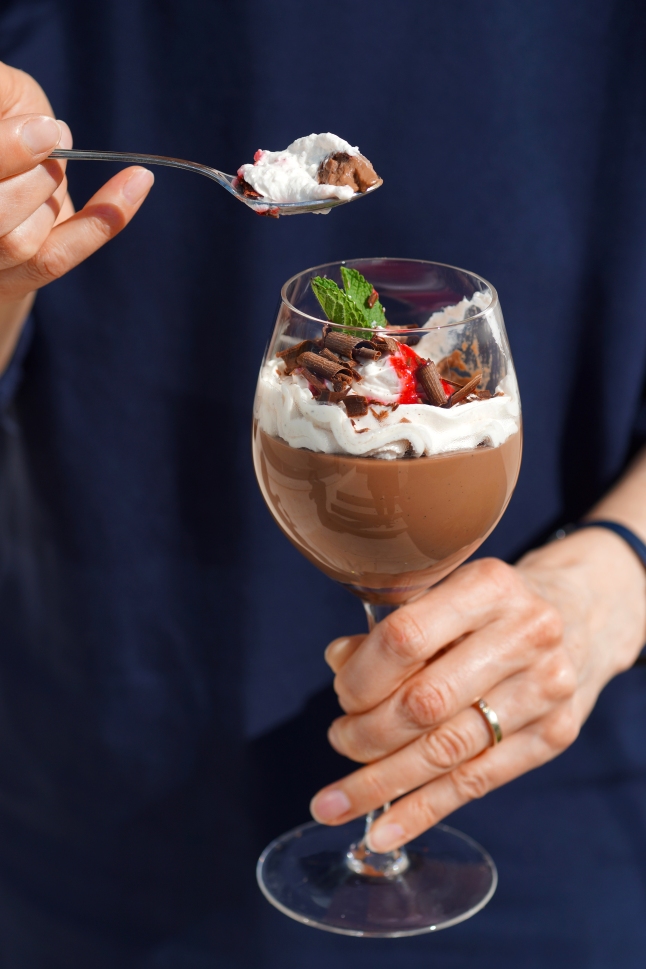
It was inspired by this cake from Caketime by Tamaris, however, I changed quite a lot of the recipe, for instance, I chose to use yoghurt instead of cream cheese, I added pears and sponges…you get the idea. I planned the cake for quite a few days and also tested parts of it. The key layer for me was the chocoalte mousse, which I perfected in a not too heavy version without eggs. Here you can see how I developped (and tasted!) my ideal chocolate mousse for the cake.

DSC05207b.jpg

When we cut into this cake on my birthday, I was delighted. The layers were distinct and the flavours in perfect harmony.

dsc05291b

As my guests ate almost the entire cake at a very quick rate (which I think is a good sign), I don’t have a very beautiful picture of the inside. Still, in these two you can more or less see what it looked like.

DSC05292b.jpg

DSC05294b.jpg

I am really in love with this cake – it is quite time-intensive, but it is worth every minute! Don’t forget to send me pictures, if you ever try it out!

DSC05236b.jpg

Have a lovely Sunday!

Best wishes from

Bettina, currently living in Winter Wonderland.

DSC05113b.jpgdsc05234bDSC05061b.jpg


_________________________________

Oreo Baileys Chocolate Mousse Cake with Pears

working time: about 2h 30 min
baking time: about 10 min
yield: a cake (with 20cm diameter)

Ingredients:

Bottom layer:

­       155g Oreos

­       55g butter

­       2 EL Baileys


Sponge:

­       4 eggs

­       120g sugar

­       1 pinch of salt

­       2 tbsp. warm water

­       zest of ½ a lemon

­       80g flour


­       2-3 tbsp. sugar for the kitchen towels

Filling:

­       2 pears

­       2-3 tbsp. sugar


­       540g Greek yoghurt

­       200g mascarpone

­       1 tsp. vanilla extract

­       8 tbsp. muscovado sugar

­       120g dark chocolate

­       3-6 EL Baileys

­       2.5 dl cream

­       6 gelatin sheets


Decoration:

­       at least 4 Oreos

­       100-125g dark chocolate couverture

­       1-1.5 dl cream

­       1-2 tbsp. Baileys

­       1-2 tbsp. powdered sugar

­       1 sachet Express Gelatine (or whipping cream stiffener)

Preparation:

  1. Preheat the oven (or, if you have the possibility, two ovens) to 220°C.
  2. For the bottom layer: Grind the Oreos and mix them with melted butter and Baileys. Press into a cake ring and put into the fridge for about half an hour.


  1. In the meantime, prepare the pears: Peel the pears and cut them into bite-sized pieces. Put them together with 2-3 tbsp. of sugar into a small pot and let them cook for about 15-20 min. If necessary, you can add a bit of water at the beginning.


  1. Prepare the sponge: Separate the egg whites from the egg yolks. Put the egg yolks into a large bowl and put the egg whites into a medium sized bowl.
  2. Add sugar, one pinch of salt and warm water to the egg yolks. Whisk until light and fluffy. Add zest of ½ lemon. Set aside.
  3. Add a pinch of salt to the egg whites and whisk with an electric whisk until stiff. Put the whipped egg whites on top of the egg yolk-mixture.
  4. Sift the flour and ground almonds on top. Gently fold in and combine, trying to keep the volume.
  5. Pour the mixture into two tins (covered with baking parchment) and level into two squares of about 25x25cm (about 1-1.5cm high), smoothing the top with a palette knife.
  6. Bake for 8-10 minutes in the middle rack of the oven until golden brown on top. Generously sprinkle two kitchen towels with the additional white sugar. Carefully turn the sponges out of its tin onto the towels. Immediately remove the baking parchment. Cover sponges with the baking tins and let them cool down. Take the cake ring off the Oreo layer, wash it and cut the sponge layers using the cake ring as size guidance.


  1. For the filling: Put each 270g yoghurt, 100g mascarpone, ½ tsp. vanilla extract and 4 tbsp. muscovado-sugar into two different bowls. Mix to combine.
  2. Melt chocolate over a bain-marie and soak the 3 gelatin sheets for the Baileys crème in a bowl of water.
  3. Whip the cream until stiff. Add 3-6 tablespoons of Baileys to the bowl in which you want to make the Baileys crème.
  4. Put the gelatin sheets into a small pot together with 3 tbsp. of water and warm slightly until the gelatin dissolves. Add 2-3 tbsp. of the Baileys cream and mix it with the gelatin. Then, add this liquid to the rest of the crème while whisking. Carefully add half (i.e. about 125 g) of the whipped cream.IMG_20170116_183423_762b.jpg
  5. Put the Oreo bottom layer onto a cake plate. Close the ring again around the Oreo layer. Pour 2/3 of the Baileys crème into the cake ring. Lay a sponge layer on top and spread the pear cubes onto this sponge.
  6. Prepare the gelatin sheets for the chocolate mousse and add it to the yoghurt mixture for the chocolate mousse as described above. Then whisk in the melted chocolate. Carefully add the rest of the cream.
  7. Put the chocolate mousse onto the pIMG_20170116_183443_910b.jpgears (you might not need all the chocolate mousse, which is not a problem). Put the second sponge onto the chocolate mousse and on to the rest of the Baileys crème. Make sure the top is as even as possible.
  8. Let the cake set in the fridge for at least 2-3 hours or overnight.
  1. For the chocolate net: Melt dark chocolate and pipe a pattern onto kitchen foil. It should be slightly higher than the cake. Wait until the chocolate is almost set, thenIMG_20170117_073127_946b.jpg

    press the kitchen foil around the cake and put it in the fridge for 10 minutes. If you miss this moment and chocolate is already too hard, use a blow-drier to warm the chocolate up gain. Let the cake rest in a cool place


  1. Whip the cream until stiff together with powdered sugar and Express Gelatine/shipping cream stiffener. Add Baileys. Put the mixture into a piping bad and decorate the cake as you wish. You might want to use some Oreos for this as well. Let the cake rest in a cool place for another 30 min. Serve and enjoy!

(cake inspired by a cake from Caketime by Tamaris)

_________________________________

To get a printed version:
Download the pdf. (Both English and German versions available!)

Oreo Baileys Chocolate Mousse Cake with Pears (English)

Oreo-Baileys-Schokoladenmousse-Torte mit Birnen (Deutsch)
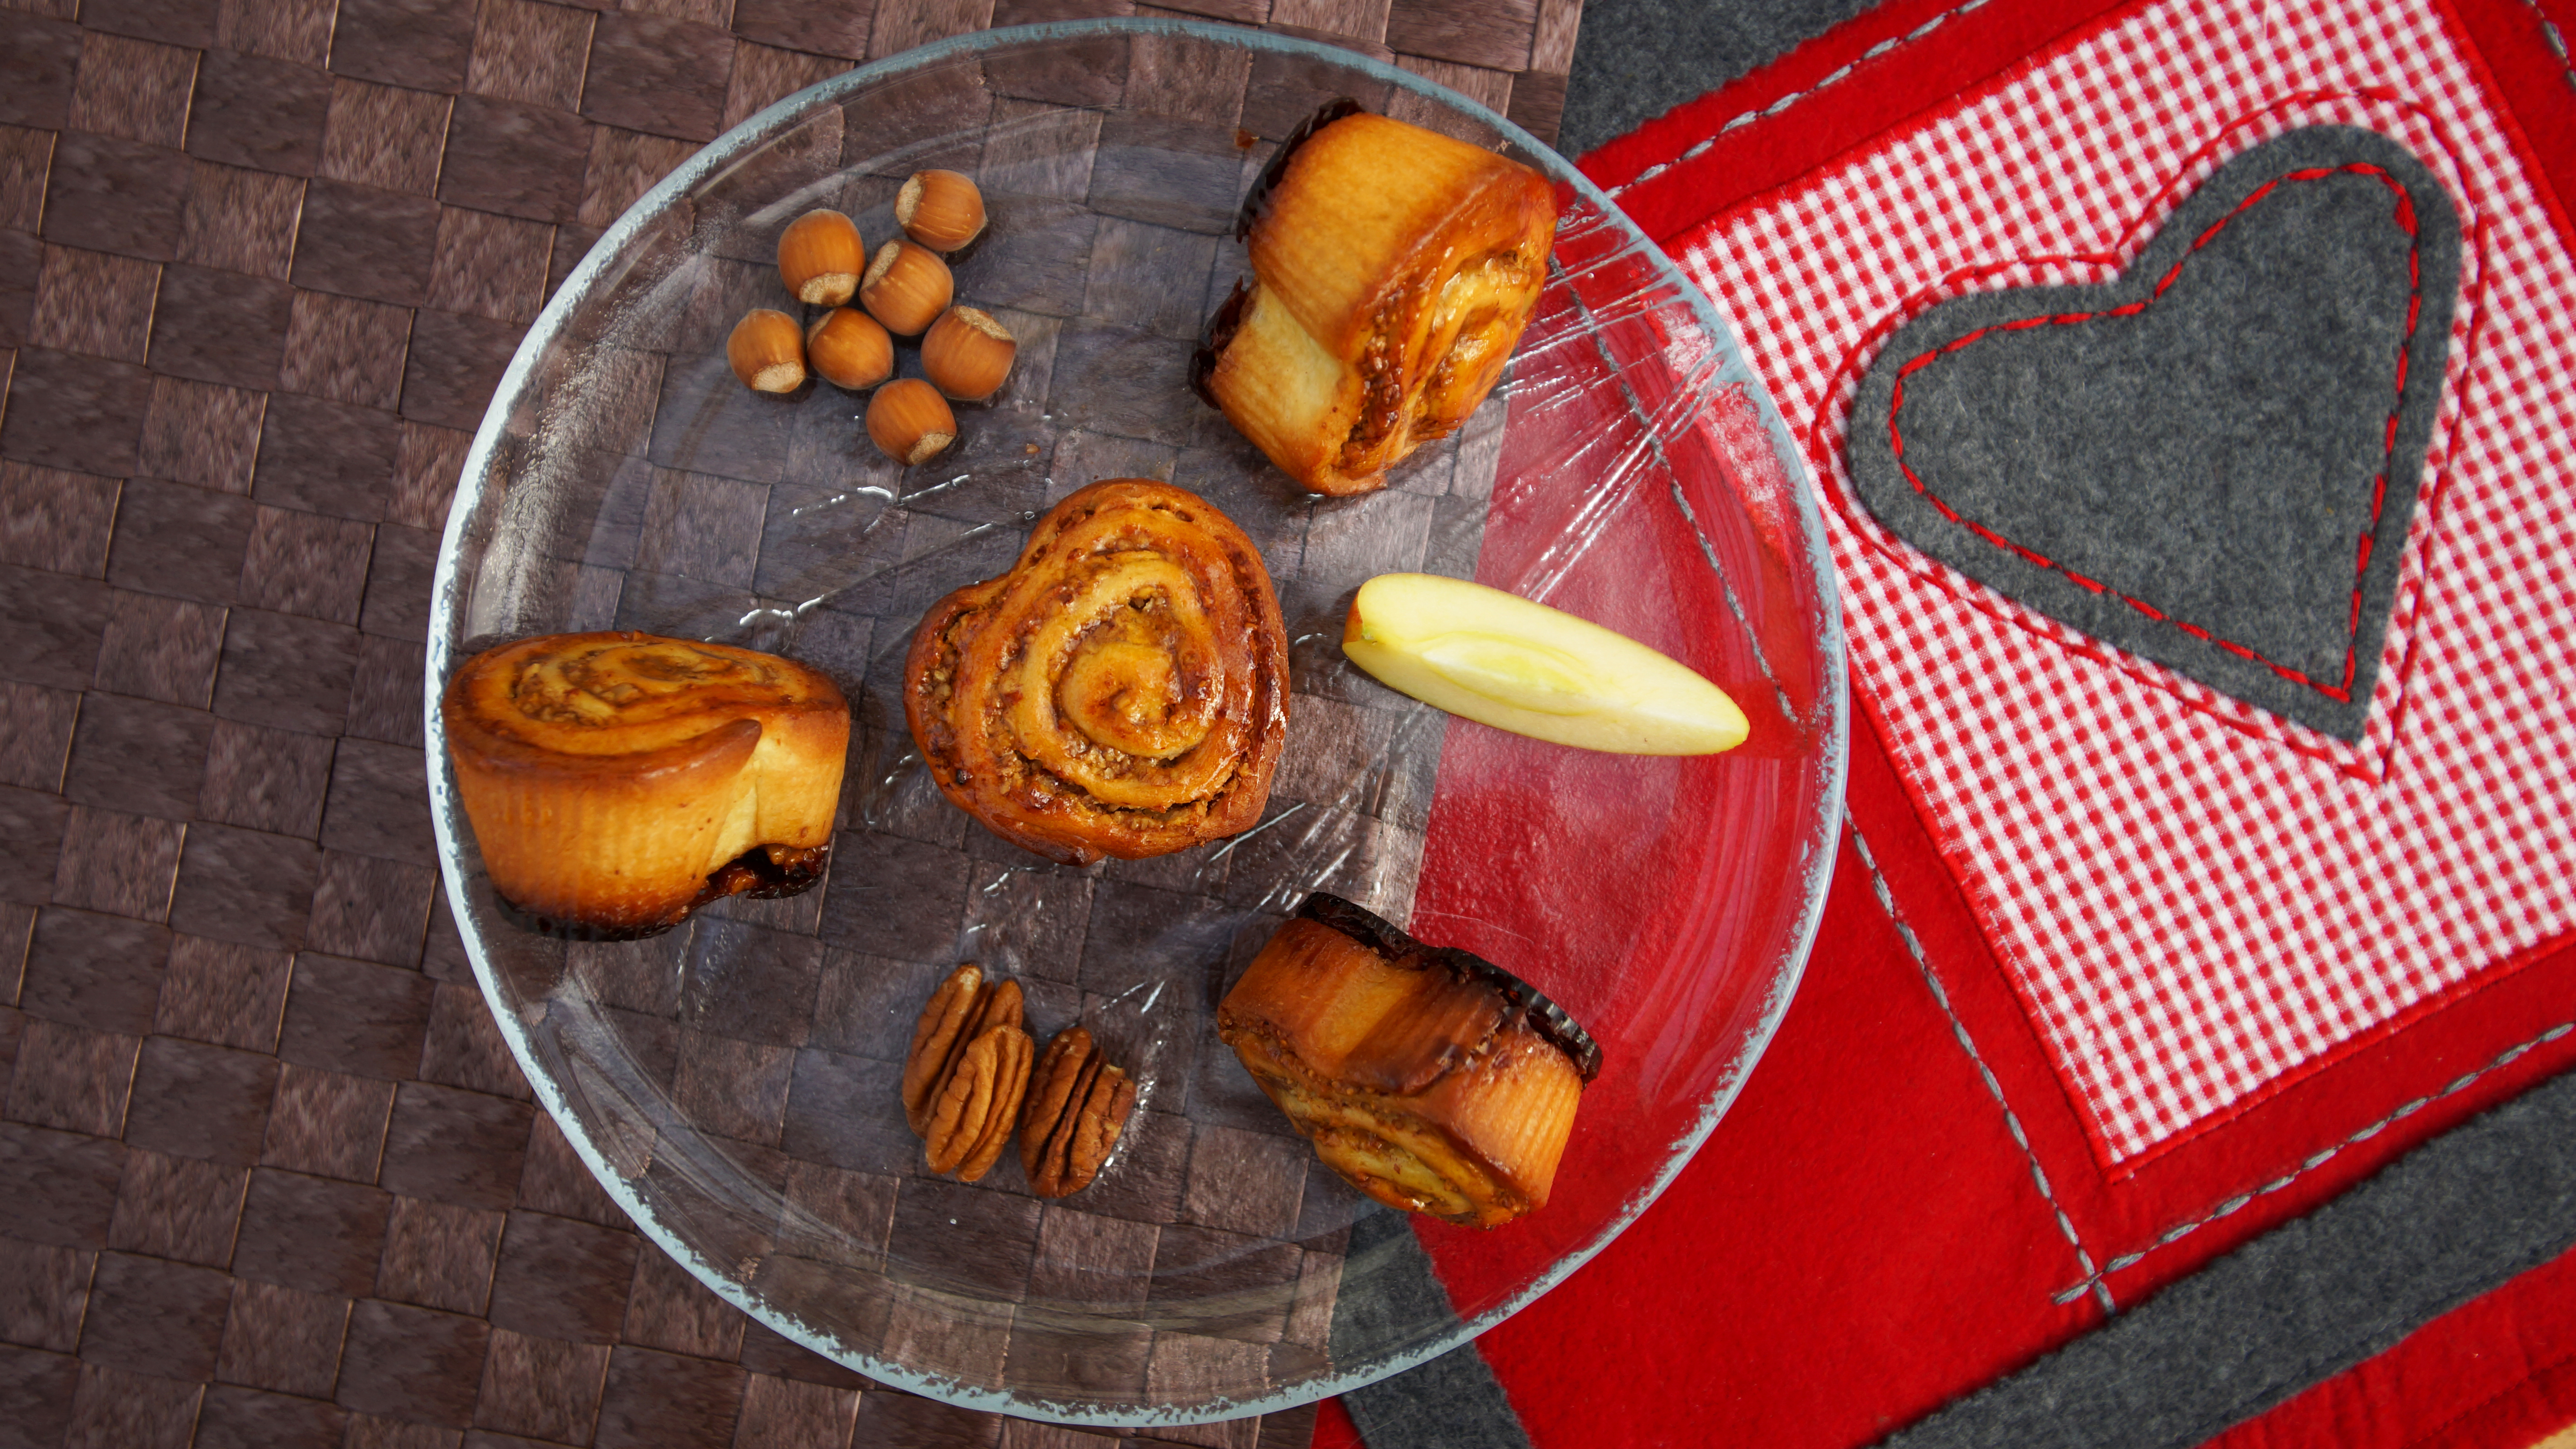
dsc05257bdsc05239b

Espresso Toblerone Cookies

dsc04478b

Hello my dears!

Christmas and the holidays are drawing closer and I can hardly wait! When I’m not busy finishing stuff for university or working – then, I am baking loooads of Christmas cookies.dsc04494b

The ones I show you here are not super traditional, but in any case super delicious. The dough is soft and full of Toblerone bits and the cookie is covered with an even more chocolately glaze. And they smell wonderfully of coffee…what more can you possibly want from a cookie?

DSC04502insta.jpg

What I love about these cookies apart from their deliciousness is how easily and quickly they are made. While some cookies such as my beloved “Spitzbuben” are time-intensive and afterwards far too quickly eaten, these here are done in a jiffy (but also quickly eaten, to be honest… 😉 ).

Merry Christmas to you all and much love!

Bettina

P.S. Here you can see how my friends on 4 paws are celebrating their Christmas… ❤

dsc04673bdsc04688bdsc04714bdsc04685b

P.P.S. Isn’t this handmade étagère fabulously Christmassy? I bought it at a small local Christmas market. 🙂dsc04489b

_________________________________

Espresso-Toblerone-Cookies

preparation time: about 20 min
baking time: 8-10 min
yield: about 60 Cookies

Ingredients:

  • 200g butter
  • 200g muscovado sugar
  • 4 tsp. vanilla sugar
  • 2 tbsp. espresso instant powder
  • 4 tbsp. cacao powder
  • 2 eggs
  •  150g Toblerone chocolate, chopped
  • 100g almond slivers, roasted
  •  300g flour
  • 2 tbsp. baking powder
  •  1 bag of dark cake glaze (which is about 150g)

Preparation:

  1. Preheat the oven to 180°C. Line three baking tins with baking parchment.
  2. Roast the almond slivers in a frying pan without fat. Set aside and let it cool down.
  3. Whisk butter in a bowl until creamy.
  4. Add muscovado sugar, vanilla sugar, salt, espresso powder, cacao powder and eggs, whisk until the mixture is lighter.
  5. Chop Toblerone into small pieces, add together with the almond slivers, stir.
  6. Sieve flour and baking powder on top and combine the mixture to form a (sticky J) dough.
  7. Form spheres about the size of am unopened walnut. Put onto the baking parchment with at least 7 cm distance from one to the other. Set aside in a cool place for 15 minutes.
  8. Bake for 8-10 minutes, during this time the spheres will melt into small heaps.
  9. Melt the cake glaze and pipe onto the (cold) cookies with quick movements.

(recipe after „Das neue Guetzlibuch“ from Betty Bossi)

_________________________________

To get a printed version:
Download the pdf. (Both English and German versions available!)

Espresso Toblerone Cookies (English)

Espresso Toblerone Kugeln (Deutsch)

dsc04484b

Heart Cinnamon Rolls with Apple, Hazelnuts and Pecan Nut Caramel

dsc04328bHello my dears!

Today’s post is again a special one – it is my guest post for Sarah from Hidden Sweet Treats. She made a lovely cupcake recipe for me including some of my favourite ingredients and I made this recipe here for here inspired by some of her favourite flavours.dsc04287bdsc04438b dsc04316bThe result was really amazing! I loved both the texture and the taste of these wonderful little hearts.dsc04304bdsc04305b

At the bottom, there’s a tender, creamy pecan nut caramel and on top sits a lovely cinnamon roll in heart shape based on the Swiss “Hefe-Schnecke”. And of course, there’s much more to the filling than only cinammon: The filling also involves hazelnuts, more pecan nuts, cream and an apple.dsc04310bdsc04428bdsc04326b

Thanks to this apple, my hearts are not too sweet and, in addition, they’re also incredibly moist and soft, thanks to the apricot jam and the caramel. Besides – I simply love baking with yeast, especially in winter! When the dough rises and transforms, that’s almost like magic to me… dsc04435bdsc04319b

In that sense, enjoy this magical time – it’s the most wonderful time of the year!

Best wishes,
Bettina.

P.S. Check out the guest post here!dsc04297b

_________________________________

Heart Cinnamon Rolls with Apple, Hazelnuts and Pecan Nut Caramel

active preparation time: about 1 h
(plus rising for about 1.5 h)
yield: about 20 hearts (if you don’t have heart shaped forms, you can also use a muffin tin)

Ingredients:

  • 120g pecan nuts (finely chopped)
  • 90g butter
  • 150g muscovado sugar
  • 10 tbsp. cream
  • 300g flour
  • 5g salt
  • 3 tbsp. sugar
  • 70g butter, softened
  • 20g fresh yeast
  • 1 dl warm milk
  • 1 egg
  • 120g ground hazelnuts
  • 30g finely chopped pecan nuts
  • 3 tbsp. muscovado sugar
  • ½ tsp. cinnamon
  • 1 apple
  • ½ lemon, zest
  • 4-6 tbsp. cream
  • about 100g apricot jam


Preparation:

  1. For the caramel: Finely chop the pecan nuts. Put butter, sugar and cream into a small pot and bring to the boil while constantly stirring. Cook the mixture at a rapid boil for 1 minute, then take it off the stove and add the pecan nuts. Evenly distribute the caramel into the heart forms.
  2.  Sieve the flour into a big bowl. Add salt.
  3. Warm the butter, whisk until cream. Then, add it to the flour mixture. Stir.
  4. Dissolve the fresh yeast and the sugar in the slightly warmed milk while stirring.
  5. Form a little well in the flour mixture and pour the yeast-milk into this well. Add the egg. Stir until the dough sticks together.
  6. Put the dough onto a lightly floured working surface and knead well for at least 8 minutes.
  7. Flour the dough and put it into a clean bowl. Cover with a slightly wet kitchen towel. Let it rise in a warm place for 45-60 min.
  8.  In the meantime, prepare the filling: Combine the ground hazelnuts, finely chopped pecan nuts, sugar, peeled and grated apple, lemon zest and cream in a small bowl. Add another tablespoon of cream, if the mixture is too dry. Set aside.
  9.  Punch the risen dough back and form a thin (2-3 mm) rectangle. Cover it with the filling. Roll it from the long side.dsc04277b
  10. Push the roll firmly together (maybe you have to roll it again). Cut the roll into slices of about 2-3 cm. Lay the slices into the heart forms and press them carefully onto the caramel. Let the hearts rise (covered by a kitchen towel) in a warm place for another 20-30 minutes. Preheat the oven to 220°C.
  11.  Bake the hearts for about 15-20 minutes. When they’re done, take them out of the oven and brush them with apricot jam (which you have previously heated in a pot) while they’re still warm.
  12. Let the hearts cool down on a cooling rack or enjoy them warm – as you prefer it.

_________________________________

To get a printed version: Download the pdf.
(Both English and German versions available!)

Heart Cinnamon Rolls with Apple, Hazelnuts and Pecan Nut Caramel (Recipe English)

Hefeteig-Herzen mit Apfel, Zimt und Pekannuss-Karamell (Rezept Deutsch)

dsc04299b

Chocolate Coffee Cupcakes with Baileys Frosting and Macadamia Nuts (Guest Post)

img_7868Hello my dears!

It’s already the third of December – time has really been flying lately! Only 22 days until Christmas, and this year I’m getting an early present: the recipe of these absolutely scrumptious looking beauties!img_7869

Sarah from the wonderful blog Hidden Sweet Treats has invented it just for me and chosen some of my favourite flavours to be the stars of her creation. When she showed me the first pictures, I felt that I could almost taste them from afar…and I cannot wait to try this recipe myself VERY soon! 🙂

But now – the stage is yours, Sarah – and thank you so very much for this fabulous recipe!

Best wishes,
Bettina.

~~~~~~~~

Hello everyone! I’m Sarah, the one behind the blog „Hidden Sweet Treats“ (www.hiddensweettreats.blogspot.ch). Being a guest on Bettina’s wonderful blog makes me really happy, because I love the baked goods she creates.

After we decided to bake something for each others blogs, I asked her if she had any wishes and she told me her favourite ingredients. The stars of my creation made part of them: chocolate, coffee, Baileys Irish Cream and macadamia nuts. As you can see, I baked some delicious cupcakes. They start with a moist and fluffy chocolate dough that I flavoured with some coffee, continue with a Baileys Irish Cream frosting made of creamcheese and whipped cream and end with some slightly salted and roasted macadamia nuts. The combination of these flavours is just amazing, the ingredients go together perfectly. And because of the coffee in the cakes and the fact that there isn’t that much sugar in the topping, they aren’t too sweet. Absolutely delicious.

Thank you Bettina for having me on your blog, it was a great pleasure!img_7872

_________________________________

Chocolate Coffee Cupcakes with Baileys Frosting and Macadamia Nuts

(for 10-12 cupcakes)

What you need:

  • for the cupcakes:
  • 100g dark chocolate
  • 125g butter
  • 120g sugar
  • 1dl espresso
  • 1dl milk
  • 1 vanilla bean
  • 1 egg
  • 135-140g flour
  • 1 tsp. baking powder
  • 20g cacao powder
  • 1 pinch of salt

for the frosting:

  • 30g butter
  • 200g cream cheese (e.g. Philadelphia)
  • ½-1dl Baileys
  • 2-3 tbsp. powdered sugar
  • 1 tsp. cacao powder
  • 1 tsp. gelatine express powder (e.g. Dr. Oetker)
  • 1dl cream
  • ½ sachet whipping cream stiffener (e.g. Dr. Oetker)

in addition:

  • 50g macadamia nuts
  • 1-2 pinches of salt

How to do it: 

  1. Prepare a muffin tin for 10 to 12 cupcakes. Preheat the oven to 180°C.
  2. Cut the butter into small cubes. Chop the chocolate and put it together with the butter over a bain-marie. Mix flour, baking powder, cacao, salt and vanilla in a bowl. Put the chocolate-butter mixture into another bowl and let it cool down. Add sugar, milk and espresso; whisk well. Add the egg and whisk again. Add the flour mixture and whisk until everything is well mixed.
  3. Pour the dough into the prepared muffin tin (each muffin liner should be about 2/3 full) and bake for 20-25 minutes. Check on the muffins after about 20 minutes, if necessary bake for a few more minutes. (Mine were perfect after 23 minutes.) Take them out of the oven and let them cool down completely.
  4. For the frosting: Whip the butter until creamy. Add cream cheese, Baileys, powdered sugar and cacao and continue to whisk while adding the gelatine express powder. Taste and add more powdered sugar or Baileys if you like. Whisk the cream in a separate bowl until stiff together with the whipping cream stiffener. Fold the cream carefully into the cream cheese mixture. Put the frosting into a piping bag with a round nozzle and put it into the fridge for 30 minutes.
  5. Chop the macadamia nuts and roast them in a pan (without fat). Put them into a bowl and season them with 1-2 pinches of salt.
  6. Distribute the frosting onto the cupcakes, put the macadamia nuts on to and enjoy.

Recipe by Sarah from Hidden Sweet Treats

_________________________________

To get a printed version: Download the pdf. (Both English and German versions available!)

chocolate-coffee-cupcakes-with-baileys-frosting-and-macadamia-nuts

schokoladen-kaffee-cupcakes-mit-baileys-frosting-und-macadamianussenimg_7870